Utah_jeepster
Super Moderator
Lately I have been getting a random missfire in my jeep.
(lack of offroading).
I have been using it all winter as a daily driver and with regeared axles and transmission/transfer case, my RPM's rarely got over 3000 rpm's. I have been getting the check engine light flashing at 2800+ RPM's with a slight down hill on certain sections of the freeway after I reached operating temp.
Well the other day I got more than a "check engine light", I was pushed into a 'limp home mode" coming home in a fierce head wind and freeway speeds around 75mph (3100rpm) . When I got home I pulled my OBD II reader out and got P0300 (random misfire) and P0301(misfire cylinder 1), P0302, P0303 P0305, and P0306.
I have replaced the plugs, ignition coil rail, throttle body position sensor (a slight voltage drop at the beginning) it was not related to this problem.
SO I isolated it down to a Technical Service Bulletin.
NOTE : THIS BULLETIN APPLIES TO VEHICLES EQUIPPED WITH A 4.0L ENGINE (SALES CODE = ERH).
SYMPTOM/CONDITION:
The customer may experience an incident of engine misfire during certain vehicle operating conditions. The misfire may occur when the vehicle is operated between 80 - 112 KPH (50 - 70 MPH) and under light loading conditions, e.g. slight uphill road grades. This condition may occur at all ambient conditions, but is more noticeable when ambient conditions are less than 0°C (32°F).
If the vehicle is equipped with On-Board Diagnostic (OBD), a MIL illumination may also have occurred due to Diagnostic Trouble Code (DTC) P0300 - Multiple Cylinder Misfire. Various single cylinder misfire DTC's may also be present. If the frequency of misfire is high the Powertrain Control Module (PCM) may place the engine in "Limp-In" mode.
The misfire condition may be caused by one or more engine exhaust valves that are slow to close. Late closure of an exhaust valve may be the result of no valve rotation and associated build up of carbon on the exhaust valve stem.
DIAGNOSIS:
1.This condition may occur when the engine is not allowed to run at engine RPM's that are greater than 3,200 RPM. At 3,200 RPM or higher the engine exhaust valves will rotate if not impeded by high carbon deposits. Low engine RPM's and high carbon deposits are associated with short trip driving where the vehicle engine is not allowed to fully warm to normal engine operating temperatures. Cold ambient temperatures will increase engine warm-up time and add to the opportunity of carbon deposit build-up on the stem of the engine exhaust valve.
2.Verify that an engine misfire condition is present. Use of the DRBIII(R) during a road test, or a Co-Pilot data recording, may help to determine engine misfire and misfire counts. If carbon deposit accumulation is severe, then a cylinder leak down test may detect one or more cylinders leaking greater than 15%. Save any misfire DTC Freeze Frame Data that was stored for later misfire correction verification.
3.Verify that the engine misfire condition is not caused by faulty engine mechanical or electrical components.
4.If the engine mechanical and electrical systems are operating properly perform the Repair Procedure
INSPECTION:
1.Raise vehicle hood.
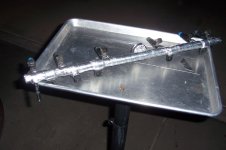
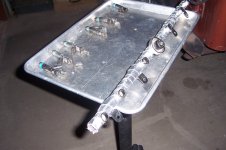
2.Remove the engine valve cover and all six exhaust valve rocker arms (the intake rocker arms are also removed during this step). Refer to the appropriate vehicle Service Manual for detailed removal instructions. The valve cover gasket is reuseable. Keep each pair of rocker arms matched to their respective valve and cylinder.
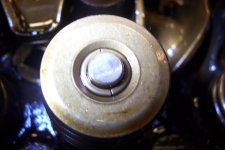
3.Inspect the end, or tip, of each exhaust valve stem where it makes contact with the respective rocker arm.
4.Determine if each exhaust valve is rotating within its respective valve guide. An exhaust valve that is rotating will have a "bulls eye" or circular wear pattern on the face of the valve stem tip. If the exhaust valve is not rotating a straight mark-like pattern will be present across the face of the valve stem tip.
5.If there are exhaust valves which are not rotating then proceed to the VALVE ROTATION section of this Repair Procedure.
6.If all exhaust valves are rotating, then this bulletin does not apply and further diagnosis is required. Install the engine rocker arms and valve cover. Refer to the appropriate vehicle Service Manual for detailed installation instructions.
VALVE ROTATION:
1.If one or more engine exhaust valves are not rotating, perform the valve rotation procedure to all six (6) exhaust valves.
NOTE :IT IS IMPORTANT THAT THE VALVE ROTATION SECTION OF THIS REPAIR PROCEDURE BE PERFORMED.
2.Clean and mark the tip of each exhaust valve stem with a paint marker. The paint mark will be used later to assist with determining if the exhaust valve has been rotated 90°.
3.Bring number one ( # 1) cylinder piston to top dead center using the mark on the crankshaft front dampener/pulley. This step is important to prevent the possibility of the exhaust valve from falling completely into the cylinder.
4.Install the essential service tool valve spring compressor, MD-998772A, to the # 1 cylinder exhaust valve spring.
NOTE : THE FOLLOWING VALVE ROTATION PROCEDURE WAS DEVELOPED WITH THE USE OF VALVE SPRING COMPRESSOR TOOL MD-998772A. THE MD-998772A IS AN ESSENTIAL SERVICE TOOL AND PART OF THE DEALERSHIP REQUIRED TOOLS. THE MD-998772A COMPRESSOR ENGAGES THE ENTIRE PERIMETER OF THE VALVE SPRING RETAINER, UNLIKE OTHER MAKE VALVE SPRING COMPRESSORS.
5.Compress the # 1 cylinder exhaust valve spring enough to gain access so that the exhaust valve can be rotated 90°. Rotate the exhaust valve 90°. Slowly remove the compression on the exhaust valve spring. Verify that the valve keeper is properly seated to the valve stem and valve spring retainer.
6.The 4.0L firing order is 1 - 5 - 3 - 6 - 2 - 4. Without rotating the engine crankshaft repeat steps 3 through 5 to cylinder # 6.
7.Rotate the engine crankshaft 1200 and repeat steps 3 through 5 to cylinders # 5 and # 2.
8.Rotate the engine crankshaft another 1200 and repeat steps 3 through 5 to cylinders # 3 and # 4.
9.Install all cylinder rocker arms (intake and exhausts) and retaining bridge. Make certain that the push rods are properly seated to their respective rocker arm and lifter. Tighten the respective cylinder bridge/rocker arm cap screws to 30 Nm (21 ft. lbs.) when each cylinder piston is at top dead center (cylinder intake and exhaust valves are closed).
10.Install the engine cylinder head valve cover. Tighten the valve cover bolts to 10 Nm (85 in. lbs.). Refer to the appropriate vehicle Service Manual for detailed assembly instructions.
DECARBONING COMBUSTION CHAMBER AND VALVES:
1.Start the vehicle engine and allow the engine to reach normal operating temperature.
2.Remove the air tube from the engine throttle body.
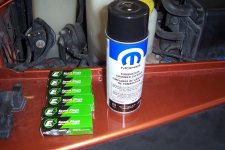
3.With the engine at idle, spray the entire contents of Mopar Combustion Chamber Cleaner, p/n 04318001AB, directly into the throttle body. As the cleaner is being ingested, allow the vehicle to "load up" with the cleaner to the point that the engine is almost stalling out. Maintain this condition until all of the cleaner is used/ingested.
4.Stop the engine once the entire can of cleaner has been ingested.
5.Install the air tube to the throttle body.
6.With the hood closed and the vehicle parked inside the garage, allow the vehicle engine to heat soak for two to three hours. This will ensure that the engine will maintain its temperature and will allow proper solvent penetration.
7.After engine soak, start the engine and drive the vehicle until the engine is has reached normal engine operating temperatures.
8.If the vehicle is equipped with an automatic transmission, place the gear selector into "L" (low). If the vehicle is equipped with a manual transmission, place the transmission into first gear.
9.In a safe vehicle operating location that will allow the vehicle to be driven safely and at the posted speed limit, accelerate the vehicle until the engine reaches 4500 RPM.
10.Hold the engine speed at this RPM for 15 seconds.
11.Slow down and in a safe location pull to the side of the road. Allow the engine to idle for five seconds.
12.Repeat steps 9 through 11 five more times.
13.With the vehicle at operating temperature and using any available Freeze Frame data recorded when the misfire DTC occurred, verify that the misfire condition has been corrected.
14.Erase any engine DTC's once the misfire condition has been corrected.
So it looks like I will be pulling the valve cover this sunday or monday over at Big O tire ( a friends shop). Will grab a few picks when I do this.
(lack of offroading).
I have been using it all winter as a daily driver and with regeared axles and transmission/transfer case, my RPM's rarely got over 3000 rpm's. I have been getting the check engine light flashing at 2800+ RPM's with a slight down hill on certain sections of the freeway after I reached operating temp.
Well the other day I got more than a "check engine light", I was pushed into a 'limp home mode" coming home in a fierce head wind and freeway speeds around 75mph (3100rpm) . When I got home I pulled my OBD II reader out and got P0300 (random misfire) and P0301(misfire cylinder 1), P0302, P0303 P0305, and P0306.
I have replaced the plugs, ignition coil rail, throttle body position sensor (a slight voltage drop at the beginning) it was not related to this problem.
SO I isolated it down to a Technical Service Bulletin.
NOTE : THIS BULLETIN APPLIES TO VEHICLES EQUIPPED WITH A 4.0L ENGINE (SALES CODE = ERH).
SYMPTOM/CONDITION:
The customer may experience an incident of engine misfire during certain vehicle operating conditions. The misfire may occur when the vehicle is operated between 80 - 112 KPH (50 - 70 MPH) and under light loading conditions, e.g. slight uphill road grades. This condition may occur at all ambient conditions, but is more noticeable when ambient conditions are less than 0°C (32°F).
If the vehicle is equipped with On-Board Diagnostic (OBD), a MIL illumination may also have occurred due to Diagnostic Trouble Code (DTC) P0300 - Multiple Cylinder Misfire. Various single cylinder misfire DTC's may also be present. If the frequency of misfire is high the Powertrain Control Module (PCM) may place the engine in "Limp-In" mode.
The misfire condition may be caused by one or more engine exhaust valves that are slow to close. Late closure of an exhaust valve may be the result of no valve rotation and associated build up of carbon on the exhaust valve stem.
DIAGNOSIS:
1.This condition may occur when the engine is not allowed to run at engine RPM's that are greater than 3,200 RPM. At 3,200 RPM or higher the engine exhaust valves will rotate if not impeded by high carbon deposits. Low engine RPM's and high carbon deposits are associated with short trip driving where the vehicle engine is not allowed to fully warm to normal engine operating temperatures. Cold ambient temperatures will increase engine warm-up time and add to the opportunity of carbon deposit build-up on the stem of the engine exhaust valve.
2.Verify that an engine misfire condition is present. Use of the DRBIII(R) during a road test, or a Co-Pilot data recording, may help to determine engine misfire and misfire counts. If carbon deposit accumulation is severe, then a cylinder leak down test may detect one or more cylinders leaking greater than 15%. Save any misfire DTC Freeze Frame Data that was stored for later misfire correction verification.
3.Verify that the engine misfire condition is not caused by faulty engine mechanical or electrical components.
4.If the engine mechanical and electrical systems are operating properly perform the Repair Procedure
INSPECTION:
1.Raise vehicle hood.
2.Remove the engine valve cover and all six exhaust valve rocker arms (the intake rocker arms are also removed during this step). Refer to the appropriate vehicle Service Manual for detailed removal instructions. The valve cover gasket is reuseable. Keep each pair of rocker arms matched to their respective valve and cylinder.
3.Inspect the end, or tip, of each exhaust valve stem where it makes contact with the respective rocker arm.
4.Determine if each exhaust valve is rotating within its respective valve guide. An exhaust valve that is rotating will have a "bulls eye" or circular wear pattern on the face of the valve stem tip. If the exhaust valve is not rotating a straight mark-like pattern will be present across the face of the valve stem tip.
5.If there are exhaust valves which are not rotating then proceed to the VALVE ROTATION section of this Repair Procedure.
6.If all exhaust valves are rotating, then this bulletin does not apply and further diagnosis is required. Install the engine rocker arms and valve cover. Refer to the appropriate vehicle Service Manual for detailed installation instructions.
VALVE ROTATION:
1.If one or more engine exhaust valves are not rotating, perform the valve rotation procedure to all six (6) exhaust valves.
NOTE :IT IS IMPORTANT THAT THE VALVE ROTATION SECTION OF THIS REPAIR PROCEDURE BE PERFORMED.
2.Clean and mark the tip of each exhaust valve stem with a paint marker. The paint mark will be used later to assist with determining if the exhaust valve has been rotated 90°.
3.Bring number one ( # 1) cylinder piston to top dead center using the mark on the crankshaft front dampener/pulley. This step is important to prevent the possibility of the exhaust valve from falling completely into the cylinder.
4.Install the essential service tool valve spring compressor, MD-998772A, to the # 1 cylinder exhaust valve spring.
NOTE : THE FOLLOWING VALVE ROTATION PROCEDURE WAS DEVELOPED WITH THE USE OF VALVE SPRING COMPRESSOR TOOL MD-998772A. THE MD-998772A IS AN ESSENTIAL SERVICE TOOL AND PART OF THE DEALERSHIP REQUIRED TOOLS. THE MD-998772A COMPRESSOR ENGAGES THE ENTIRE PERIMETER OF THE VALVE SPRING RETAINER, UNLIKE OTHER MAKE VALVE SPRING COMPRESSORS.
5.Compress the # 1 cylinder exhaust valve spring enough to gain access so that the exhaust valve can be rotated 90°. Rotate the exhaust valve 90°. Slowly remove the compression on the exhaust valve spring. Verify that the valve keeper is properly seated to the valve stem and valve spring retainer.
6.The 4.0L firing order is 1 - 5 - 3 - 6 - 2 - 4. Without rotating the engine crankshaft repeat steps 3 through 5 to cylinder # 6.
7.Rotate the engine crankshaft 1200 and repeat steps 3 through 5 to cylinders # 5 and # 2.
8.Rotate the engine crankshaft another 1200 and repeat steps 3 through 5 to cylinders # 3 and # 4.
9.Install all cylinder rocker arms (intake and exhausts) and retaining bridge. Make certain that the push rods are properly seated to their respective rocker arm and lifter. Tighten the respective cylinder bridge/rocker arm cap screws to 30 Nm (21 ft. lbs.) when each cylinder piston is at top dead center (cylinder intake and exhaust valves are closed).
10.Install the engine cylinder head valve cover. Tighten the valve cover bolts to 10 Nm (85 in. lbs.). Refer to the appropriate vehicle Service Manual for detailed assembly instructions.
DECARBONING COMBUSTION CHAMBER AND VALVES:
1.Start the vehicle engine and allow the engine to reach normal operating temperature.
2.Remove the air tube from the engine throttle body.
3.With the engine at idle, spray the entire contents of Mopar Combustion Chamber Cleaner, p/n 04318001AB, directly into the throttle body. As the cleaner is being ingested, allow the vehicle to "load up" with the cleaner to the point that the engine is almost stalling out. Maintain this condition until all of the cleaner is used/ingested.
4.Stop the engine once the entire can of cleaner has been ingested.
5.Install the air tube to the throttle body.
6.With the hood closed and the vehicle parked inside the garage, allow the vehicle engine to heat soak for two to three hours. This will ensure that the engine will maintain its temperature and will allow proper solvent penetration.
7.After engine soak, start the engine and drive the vehicle until the engine is has reached normal engine operating temperatures.
8.If the vehicle is equipped with an automatic transmission, place the gear selector into "L" (low). If the vehicle is equipped with a manual transmission, place the transmission into first gear.
9.In a safe vehicle operating location that will allow the vehicle to be driven safely and at the posted speed limit, accelerate the vehicle until the engine reaches 4500 RPM.
10.Hold the engine speed at this RPM for 15 seconds.
11.Slow down and in a safe location pull to the side of the road. Allow the engine to idle for five seconds.
12.Repeat steps 9 through 11 five more times.
13.With the vehicle at operating temperature and using any available Freeze Frame data recorded when the misfire DTC occurred, verify that the misfire condition has been corrected.
14.Erase any engine DTC's once the misfire condition has been corrected.
So it looks like I will be pulling the valve cover this sunday or monday over at Big O tire ( a friends shop). Will grab a few picks when I do this.