Turbogus
New member
Man, I hate these things. this may cross over to Jeeps later than mine but with the way the auto industry is going I thought I'd show some photos of what I'm contending with for errant gauge readings. Note: I am NOT a know it all, I'm learning as I go as I have found very little information about these kind of gauges/insturment panels.
In keeping with JeepHammer's idiom, I always do my best to provide POSITIVE soldered connections +/- in all of my auto applications, in order to not have to do things twice.
The following photos show teardown;

here's the IP you may note the low reading of the oil pressure gauge, this I've detirmined is a flase reading (I HATE ELECTRICAL GAUGES).

First remove anything piking through the IP (like this Trip OD reset knob)

Also if you have any ancilliary switches these will have to be disconnected as well berfore removing the dash. On this application the light switch harness, snowplow lights, and bakup warning beeper defeat lever switch.

Once the dash is removed this insturment panel has four set screw in the corners, then it just pulls right out (no harness to disconnect by means show in the following photo.

This is what makes snap buckle electrical connectors unnessesary, this mates to a sub panel in the dash that makes contact with this circuit board.

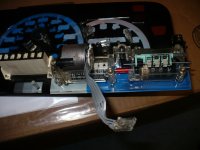
This is a shot of the back of the IP

And this is how the mfr. proposed to have electrical connections to the gauges.

A cloe up of these 'stab in' gauges from the backside.

The gauges are screwed into the back of the ip at this location, this entails seperating first the clear plastic overshield, then taking note of gauge at rest positions (I have a functioning IP for this) then removing the needles with a plastic fork or other.
The screws holding the gauges into this plate are T9 torx

These are the 'stab in' gauges

The gauges are individually numbered as I suspect there are different impedance rules for each gauge.

I took a Sharpie to the opposite side to eliminate confusion if the gauges get scrambled.
My plan is to first try to source through Mouser and others if these are available new. If not my plan is to clean then up as best I can with electrical parts cleaner.
More to come.
In keeping with JeepHammer's idiom, I always do my best to provide POSITIVE soldered connections +/- in all of my auto applications, in order to not have to do things twice.
The following photos show teardown;
here's the IP you may note the low reading of the oil pressure gauge, this I've detirmined is a flase reading (I HATE ELECTRICAL GAUGES).
First remove anything piking through the IP (like this Trip OD reset knob)
Also if you have any ancilliary switches these will have to be disconnected as well berfore removing the dash. On this application the light switch harness, snowplow lights, and bakup warning beeper defeat lever switch.
Once the dash is removed this insturment panel has four set screw in the corners, then it just pulls right out (no harness to disconnect by means show in the following photo.
This is what makes snap buckle electrical connectors unnessesary, this mates to a sub panel in the dash that makes contact with this circuit board.
This is a shot of the back of the IP
And this is how the mfr. proposed to have electrical connections to the gauges.
A cloe up of these 'stab in' gauges from the backside.
The gauges are screwed into the back of the ip at this location, this entails seperating first the clear plastic overshield, then taking note of gauge at rest positions (I have a functioning IP for this) then removing the needles with a plastic fork or other.
The screws holding the gauges into this plate are T9 torx
These are the 'stab in' gauges
The gauges are individually numbered as I suspect there are different impedance rules for each gauge.
I took a Sharpie to the opposite side to eliminate confusion if the gauges get scrambled.
My plan is to first try to source through Mouser and others if these are available new. If not my plan is to clean then up as best I can with electrical parts cleaner.
More to come.