54 cj3b 4.3 sm465 build

54cj3b

New member
Sorry some picts may be blurry or distorted never claimed to be photographer :D

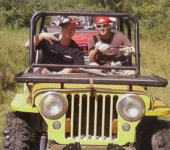
First day 3b got home in 2004

WILLYS032.jpg

WILLYS030.jpg

u-1.jpg


Beginning of tear down

Picture422.jpg

Picture433.jpg

Picture434-1.jpg

Picture431-1.jpg


After pulling engine this is what I found

Picture489.jpg

Picture490.jpg


Rusted solid only thing it was good for is a boat anchoricon_mrgreen.gif


back to tear down

Picture492.jpg

Picture493.jpg

Picture491.jpg

32.jpg

61.jpg


After the tear down I bought a 134 F head and rebuilt it


100_0267.jpg

100_0265.jpg

100_0257.jpg

Picture478-1.jpg

Picture486-1.jpg

Picture496-1.jpg

IM003023.jpg

63.jpg


After building the f head I changed my mind and bought a 4.3 along with a sm465

Picture1000.jpg

Picture999.jpg

59.jpg

58.jpg

60.jpg


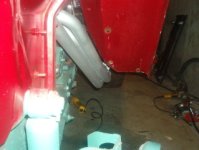
After repairing the body I put a bed liner on the tub before adding 1/4 in alum diamond plate Cutting and bending this stuff was a nightmare After going through 4 grinders 2 saws all and a jig saw I found it cuts like butter using a circular saw with a 12 tooth carbide blade used to cut plywood go figure

e-1.jpg

IM003021.jpg

Picture053.jpg

IM003020.jpg

progress.gif


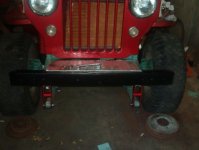
Added flairs from a S-10 blazer on rear wheel wells

019.jpg


bed lined whole inside of tub

65.jpg


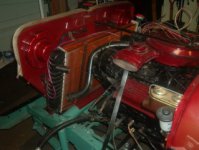
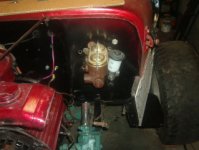
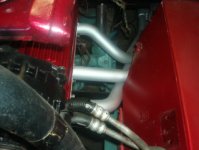
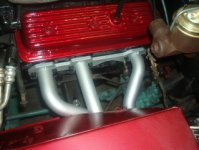
installed 4.3 along with sm465


Picture1008.jpg

Picture1007.jpg

Picture1004.jpg

009.jpg


installed fuel tank

010.jpg


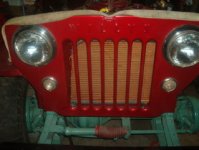
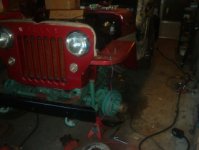
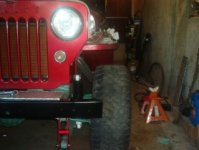
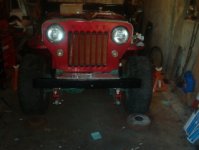
I painted the body panels but they came out like crap so i will be stripping them and redoing them

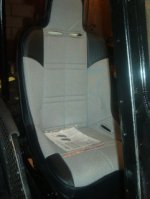
here are a bunch of goodies my wife let me order to finish my jeep

2008081112335110956_lrg.jpg

2315.jpg

27432-lg.jpg

3815-lg.jpg

G_26250G_CL_1.jpg

I went with gray seats

sum-g3136-1_w.jpg

tj_hydraulic_clutch_kit.jpg

wil-260-1304.jpg

cant wait till these goodies get here

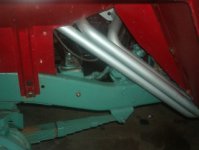
one thing I would do different next time is use the sm420 its not as bulky with the 465 be prepared to cut out the center hump on floor
trans sits about 6 inches above the floor inside jeep
now going to fab up a floor pan like this

12.jpg

Almost forgot with my progress added a wood floor to the rear tub floor

017.jpg

016.jpg

and roll bar

008.jpg

also window frame

005.jpg

6 years and still going but considering I was down 4 years with cancer think I'm getting back on track
My goal to have finished is April 2011

this is the color I'm going with

Picture046.jpg

Picture044.jpg

Burgundy pearl candy
 
Last edited by a moderator:

I took the liberty of attaching your photos ;)

Man that things looking good.
 
Well between last night and today I finished mounting the seats

cleaned up wheels and painted them

and yes the headers headers came now time to send out to be heat coated

and I see I got a better shot of the floor in tub
 

Attachments

  • 004-1.jpg
    004-1.jpg
    43.5 KB · Views: 2,043
  • 001.jpg
    001.jpg
    40.5 KB · Views: 2,014
  • 002.jpg
    002.jpg
    37 KB · Views: 2,002
  • 003.jpg
    003.jpg
    37.6 KB · Views: 2,065


Ok....I see a what I believe is a Spicer 18 (best of my knowledge) with what appears the be a drive line either: 1) brakes or 2) parking brakes. What wuz it for? Did it work well? Is is some sort of "stock" set-up (I've never seen this on an 18)? Is it still laying around your garage?
 
used the spicier18 transfer case that was beefed up with 20 gears along with the parking brake it was original and sold the T-90
 
Love the build, but honestly you lost me with the diamond plated sides. If you like them, the do it.

this build is exactly what I want to do, I got to wheel a 46 cj2a couple weeks back, pretty much bone stock except for front and rear lockers and 34" ltbs... Most fun I have ever had wheeling. but it definatly needed deeper transmission gears and looks like you got that covered. Don't mean to hijack, and please disregard the goofy passenger, it was a posed picture :roll:
 

Attachments

  • gangstah.jpg
    gangstah.jpg
    58.9 KB · Views: 312

The main reason for the diamond plate is because of all the rock out here and its probably going to be on its side a lot that way it gets the abuse not the tub and always can replace when it gets to the point I cant stand it

nice 2A yes there fun build it right you'll out perform the newer ones lol
 
oh hell ya out perform, hard to see in the back ground of that pic, but it's a red TJ on 1 tons with 39" iroks and I got stuck less than him, in fact the one time I did get stuck was because I landed on a rock that was pressing on the clutch linkage and I could not get the clutch to disengage.

The body on that 2a was pretty beat to begin with. I was just saying the diamond plate was not my taste, I personally would have just use aluminum sheet.
 
For $60. a 4x8 sheet You would use it also lol found it at a recyclers Goes for almost $280. a sheet was going just polished then I got this good deal who am I to say no:D Just a FYI its no picnic cutting it
 
Last edited:

OK headers are back was going to install them when I found out The manifold gasket is the wrong one going to pick up the right ones tomorrow
but I got the grill on and radiator installed
and both brake master cylinder and clutch master cylinder installed today
Still awaiting the lift hope it gets here soon

did I mention I'm going round 2 on ordering more goodies:funny: :beer:
 

Attachments

  • 001-4.jpg
    001-4.jpg
    36.7 KB · Views: 1,992
  • 004-3.jpg
    004-3.jpg
    41.2 KB · Views: 2,027
  • 002-3.jpg
    002-3.jpg
    44 KB · Views: 2,023
  • 003-2.jpg
    003-2.jpg
    39.6 KB · Views: 2,005
Last edited:
Did alot of wiring and ran speed o cable and few other things today no new picts yet but maybe tomorrow
 

Dana 44 rear 538 locked front 27 538 ,as for suspension stock springs with a black diamond 2.5 add a leaf and shocks soon as it gets here , been waiting impatiently for it to arrive it will have a nice flex but ride like a brick lol
well my new gaskets came so Ill put on headers today and finish wiring
 
Installed headers today look good , Had to trim inner fender wells also got left fender installed
 

Attachments

  • 002-4.jpg
    002-4.jpg
    32 KB · Views: 1,933
  • 003-3.jpg
    003-3.jpg
    34.7 KB · Views: 1,898
  • 005-2.jpg
    005-2.jpg
    36.2 KB · Views: 1,919
  • 008-2.jpg
    008-2.jpg
    36.4 KB · Views: 1,934
  • 001-5.jpg
    001-5.jpg
    42.9 KB · Views: 2,011

Well today I finished the gauge cluster

Also got front part of the lift in along with new shocks

Now I sit till the back part of my lift shows up next week
 

Attachments

  • 006-4.jpg
    006-4.jpg
    30.8 KB · Views: 1,964
  • 005-3.jpg
    005-3.jpg
    26.9 KB · Views: 1,853
  • 004-5.jpg
    004-5.jpg
    42.2 KB · Views: 1,826
  • 003-5.jpg
    003-5.jpg
    37.5 KB · Views: 1,830
  • 002-6.jpg
    002-6.jpg
    34.3 KB · Views: 1,827
  • 001-7.jpg
    001-7.jpg
    34 KB · Views: 1,812

found speedometer cable to be broken today (need to order a new one)
jacked back 1/2 of jeep up placed stands under frame in front of leafs PB all rear leaf hardware getting it ready to tear down and install rear lift busted loose all u bolts via impact gun boy I love this thing placed 2 more stands under axle to support it now a long day to come tomorrow ,
 
Back
Top