TWDJ
New member
As this is my 1st build thread ever, I spent some time looking at how others have successfully created and updated their project Jeep. One thing became immediately apparent and that is the need for LOTS of pics which I will start doing as soon as I can. As there is no place better to start than the beginning, I'll start with what was brought home on Day 1.
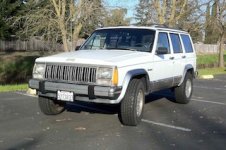
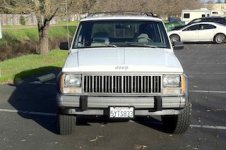
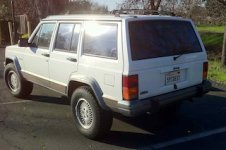
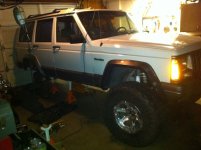
1993 Cherokee (XJ) Country. ~150K miles, relatively well maintained, and totally stock save for some REALLY ugly aluminum wheels and pretty decent 30x9.5/15 LT tires. The day my wife and I were to pick up the XJ the interior lights, radio and door locks stopped working all at once. The owner had checked all fuses and taken the door panel off to check wiring … no power. Must have been some major electrical issue. We knocked off some bucks, struck our deal and I was on my way.
Item 1 - I found it odd that 3 items would stop working at the same time so off to Kragen I went and picked up the basic repair manual from Chilton. As with my YJ from years ago, I knew there were fuses in 2 locations (interior and under the hood) so wanted to check them all. Sure enough, blown fuse under the hood! The PO did not know to check there apparently. Replaced fuse and all worked again.
Item 2 - Rear tires rubbed every time I had passengers in the back seat and rolled over any kind of dip in the freeway. As the owner had also thrown in the OEM aluminum wheels, the second order of business was to get the good tires off those awful wheels and mounted/balanced on the OEM wheels. Looked better and the rubbing went away (less wheel BS as it turned out).
Now came the time to get all the REALLY worn stuff taken care of. Remember when I said it was reasonably well maintained? Well, fluids and lubrication had been done and the vehicle kept clean. That was the maintenance. I was amazed at the number of factory OEM parts still in use … shocks, fuel filter, axle oil (I think). So, time to get all that taken care of so I can see what is really needed to get things "off road ready". The list is as you'd expect for a 17 year old vehicle with 150K miles. Spring sag was not significant (17.5 F; 16.25 R) but budget was tight so I opted to replace bushings, etc. and see if the normal ride height came back. So, here's what was done:
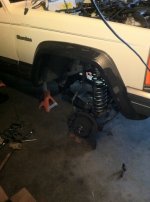
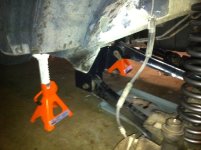
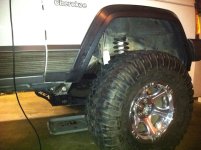
(1) Rebuilt the front suspension: upper and lower control arms, front wheel bearings (1 was loose so both were replaced), and upper and lower ball joints on both sides (1 upper was loose on 1 side so all 4). Did not replace coil springs at this time.
(2) Temporarily removed front sway bar just to make crawling around easier.
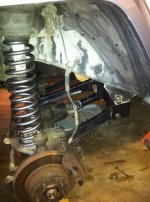
(3) Rebuilt rear suspension. Replaced all bushings but left springs alone.
(4) Off came the rear sway bar (forever!).
(5) New KYB shocks front and rear.
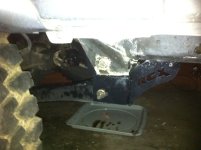
(6) Recovery points front and rear: Draw-Tite w/ "D" ring.
(7) Took apart and cleaned up all battery connections and terminals. Sealed with "liquid tape". No more crud!
WOW, what an improvement! No more wandering around the road, quiet over speed bumps and no more clunking. My ride height had not changed much (17.5 F; 16.50 R) so I knew springs were in my future at some point. Still some vibrations and rattling at speed but drove that way for about 6 months.
In November, around Thanksgiving, I had to make a trip to Portland, OR (~600 miles north) to see my folks before my mom went in for open heart surgery. Surgery went well (thank GOD!) and we returned home. During the trip up and back however, some other issues made themselves apparent. The familiar "squeak, squeak, squeak" that rises and falls with speed told me the U-joints were not happy. There was also an incredible CLUNK which shook the vehicle one morning when I started it. Hmmm … started again and it did not clunk but now I had a nasty vibration that wasn't there before. Well, 600 miles from home and 18*F (yes it gets THAT cold in Portland), there was no time to spend messing with it there so the trip home was made.
Once back in Elk Grove, the Jeep went off to my friends at Elk Grove Muffler and Transmission where we found out a few things:
(1) 1 motor mount was broken clean (remember the incredible CLUNK?), 1 was hanging on and the transmission mount was not too far behind (replaced all).
(2) Innards of the catalytic converter were loose. Take your fist and hit the bottom and you could hear it clunk (replaced it with low flow unit and MagnaFlow muffler).
(3) U-joints were so wobbled out that the yokes were egg-shaped (new yokes, new U-joints and balance driveshafts).
WOW, again what an improvement. Smoother starting and a LOT less vibration. Took it out onto the freeway and it was so smooth and quiet (even with the MagnaFlow). For the last few months I'd been blaming noise, vibration and wandering on the tires and found out they are fine … it was the driveline all along!
Then came the fun stuff …
(1) Airaid intake (however, after reading some of the REALLY bad things about gauze/oil type filters I am putting the factory air box back on).
(2) PowerAid Throttle body.
Without going into all the details, made another fast trip to Oregon after all this and picked up 1.5mpg (up to 19mpg average on highway) not too mention how much smoother and quieter it all was.
Well, that brings me to where I am with the XJ at present. Next entry will be for Phase 1 of the upgrades.
Oh, and I'll post some pics as soon as I get some uploaded.
=====
1993 Cherokee (XJ) Country. ~150K miles, relatively well maintained, and totally stock save for some REALLY ugly aluminum wheels and pretty decent 30x9.5/15 LT tires. The day my wife and I were to pick up the XJ the interior lights, radio and door locks stopped working all at once. The owner had checked all fuses and taken the door panel off to check wiring … no power. Must have been some major electrical issue. We knocked off some bucks, struck our deal and I was on my way.
Item 1 - I found it odd that 3 items would stop working at the same time so off to Kragen I went and picked up the basic repair manual from Chilton. As with my YJ from years ago, I knew there were fuses in 2 locations (interior and under the hood) so wanted to check them all. Sure enough, blown fuse under the hood! The PO did not know to check there apparently. Replaced fuse and all worked again.
Item 2 - Rear tires rubbed every time I had passengers in the back seat and rolled over any kind of dip in the freeway. As the owner had also thrown in the OEM aluminum wheels, the second order of business was to get the good tires off those awful wheels and mounted/balanced on the OEM wheels. Looked better and the rubbing went away (less wheel BS as it turned out).
Now came the time to get all the REALLY worn stuff taken care of. Remember when I said it was reasonably well maintained? Well, fluids and lubrication had been done and the vehicle kept clean. That was the maintenance. I was amazed at the number of factory OEM parts still in use … shocks, fuel filter, axle oil (I think). So, time to get all that taken care of so I can see what is really needed to get things "off road ready". The list is as you'd expect for a 17 year old vehicle with 150K miles. Spring sag was not significant (17.5 F; 16.25 R) but budget was tight so I opted to replace bushings, etc. and see if the normal ride height came back. So, here's what was done:
(1) Rebuilt the front suspension: upper and lower control arms, front wheel bearings (1 was loose so both were replaced), and upper and lower ball joints on both sides (1 upper was loose on 1 side so all 4). Did not replace coil springs at this time.
(2) Temporarily removed front sway bar just to make crawling around easier.
(3) Rebuilt rear suspension. Replaced all bushings but left springs alone.
(4) Off came the rear sway bar (forever!).
(5) New KYB shocks front and rear.
(6) Recovery points front and rear: Draw-Tite w/ "D" ring.
(7) Took apart and cleaned up all battery connections and terminals. Sealed with "liquid tape". No more crud!
WOW, what an improvement! No more wandering around the road, quiet over speed bumps and no more clunking. My ride height had not changed much (17.5 F; 16.50 R) so I knew springs were in my future at some point. Still some vibrations and rattling at speed but drove that way for about 6 months.
In November, around Thanksgiving, I had to make a trip to Portland, OR (~600 miles north) to see my folks before my mom went in for open heart surgery. Surgery went well (thank GOD!) and we returned home. During the trip up and back however, some other issues made themselves apparent. The familiar "squeak, squeak, squeak" that rises and falls with speed told me the U-joints were not happy. There was also an incredible CLUNK which shook the vehicle one morning when I started it. Hmmm … started again and it did not clunk but now I had a nasty vibration that wasn't there before. Well, 600 miles from home and 18*F (yes it gets THAT cold in Portland), there was no time to spend messing with it there so the trip home was made.
Once back in Elk Grove, the Jeep went off to my friends at Elk Grove Muffler and Transmission where we found out a few things:
(1) 1 motor mount was broken clean (remember the incredible CLUNK?), 1 was hanging on and the transmission mount was not too far behind (replaced all).
(2) Innards of the catalytic converter were loose. Take your fist and hit the bottom and you could hear it clunk (replaced it with low flow unit and MagnaFlow muffler).
(3) U-joints were so wobbled out that the yokes were egg-shaped (new yokes, new U-joints and balance driveshafts).
WOW, again what an improvement. Smoother starting and a LOT less vibration. Took it out onto the freeway and it was so smooth and quiet (even with the MagnaFlow). For the last few months I'd been blaming noise, vibration and wandering on the tires and found out they are fine … it was the driveline all along!
Then came the fun stuff …
(1) Airaid intake (however, after reading some of the REALLY bad things about gauze/oil type filters I am putting the factory air box back on).
(2) PowerAid Throttle body.
Without going into all the details, made another fast trip to Oregon after all this and picked up 1.5mpg (up to 19mpg average on highway) not too mention how much smoother and quieter it all was.
Well, that brings me to where I am with the XJ at present. Next entry will be for Phase 1 of the upgrades.
Oh, and I'll post some pics as soon as I get some uploaded.
=====