Lift your TJ - installing a Rubicon Express 2" coil spacer kit

TerryMason

Administrator
Staff member
While my Wrangler was still at stock height I took it on a wheeling trip at a local fire access road. I was one of the few stock Jeeps, and while everyone trucked along merrily I scraped over what appeared to be small rocks. As soon as I returned home I begain researching lift kits. My 2005 TJ had about 60,000 miles on it, with a stock suspension. I narrowed my list of requirements down to the following:

1. Less than 3" of lift. This was my daily driver, and I didn't want anything too agressive
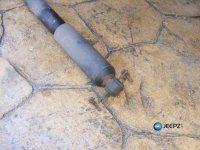
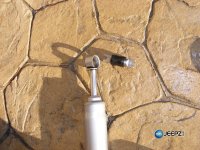
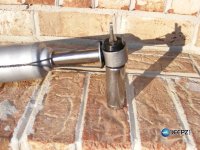
2. New shocks. With 60,000 on the originals, I wanted new shocks to improve the ride.
3. Handling as close to stock as possible. I didnt' want to be all over the road.
4. Cheap.

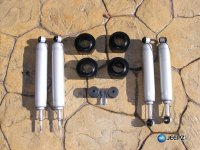
After some researching, I found the 2 inch Budget Boost by Rubicon Express (RE7030), which fit all of my requirements.

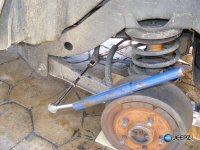
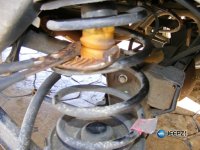
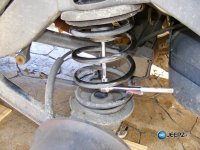
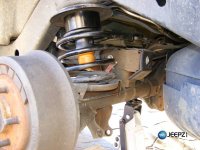
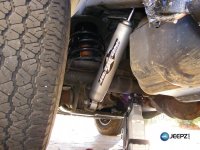
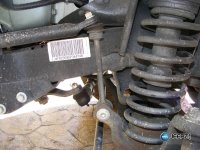
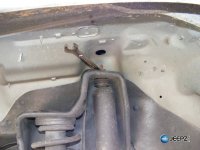
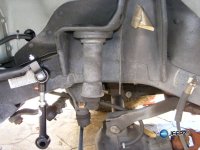
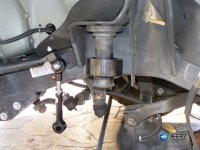
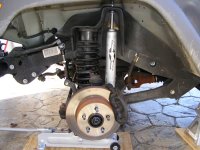
The idea of a coil spacer is that you use the existing coil suspension, and simply put a two inch spacer on top to give you a bit more height. Shocks are also replaced since the suspension will travel farther than the stock setup could. It is the cheapest suspension lift (short of making your own). A 2" lift should allow you to wheel with 31 inch tires, or run 33 inch tires on the road.

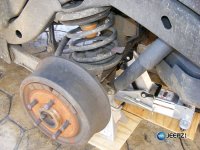
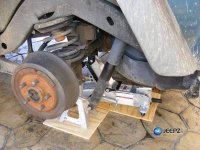
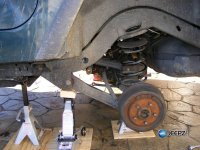
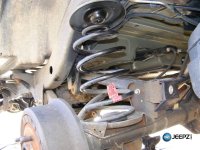
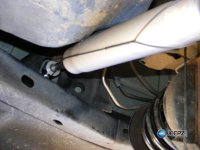
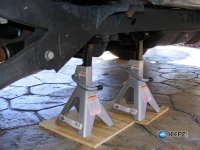
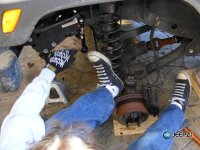
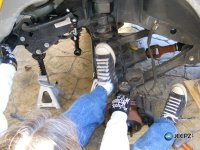
Overall the install wasn't too bad. I had never worked with coil springs before, and spent alot of time positioning the jack in wrong spots. The install took me two days, working from noon till 5 pm each day.
 

Attachments

  • rubicon_express_jeep_wrangler_coil_suspension_lift.JPG
    rubicon_express_jeep_wrangler_coil_suspension_lift.JPG
    100.8 KB · Views: 11,021
Last edited:

The kit - Rubicon Express budget boost

Here are the componets of the RE7030:

4 coil spacers
2 longer bumpstops and bolts to go in them
4 new shocks
some of the least helpful instructions I've ever read

It's a pretty short list. Here's a shot of the lift kit, and the directions
 

Attachments

  • rubicon_express_jeep_wrangler_coil_suspension_lift.JPG
    rubicon_express_jeep_wrangler_coil_suspension_lift.JPG
    100.8 KB · Views: 934
  • Jeep_wrangler_lift_instructions_1_jeep_wrangler_coil_suspension_lift.jpg
    Jeep_wrangler_lift_instructions_1_jeep_wrangler_coil_suspension_lift.jpg
    187.9 KB · Views: 3,771
  • Jeep_wrangler_lift_instructions_2_jeep_wrangler_coil_suspension_lift.jpg
    Jeep_wrangler_lift_instructions_2_jeep_wrangler_coil_suspension_lift.jpg
    292.2 KB · Views: 2,701
Last edited:
1 - Jack up and remove wheel

I decided to start with the easiest first, which means the rear wheels. I decided that I'd just do one wheel at a time, but if you've got some big boy pants, you could probably do both.

First, put some wheel chocks in front of and behind the front wheels. Now, place your jack under the rear axle and jack it up. I jacked the rear axle as high as my standard jack would go. Then put a jack stand under the side frame rail. I put a second jack under the rear axle, just to be on the safe side.

Once safely jacked up, remove your rear wheel.
 

Attachments

  • remove_wheel_jeep_wrangler_coil_suspension_lift.JPG
    remove_wheel_jeep_wrangler_coil_suspension_lift.JPG
    90.4 KB · Views: 3,187
2 - remove the shock

Now, we'll have to remove the rear shock. There are two bolts in the top of the shock (first photo), as well as a large bolt with a nut at the bottom. Finally, you can see the shock off the vehicle.
 

Attachments

  • rear_shock_jeep_wrangler_coil_suspension_lift.JPG
    rear_shock_jeep_wrangler_coil_suspension_lift.JPG
    41.5 KB · Views: 4,106
  • rear_shock_disconnected_jeep_wrangler_coil_suspension_lift.JPG
    rear_shock_disconnected_jeep_wrangler_coil_suspension_lift.JPG
    90.7 KB · Views: 5,361
  • rear_shock_removed_jeep_wrangler_coil_suspension_lift.JPG
    rear_shock_removed_jeep_wrangler_coil_suspension_lift.JPG
    86.5 KB · Views: 963

3 - Remove the rear sway bar

The rear sway bar reduces body roll when you're on the road, but right now it will prevent us from dropping the rear axle down, so it's gotta go.

Just remove the bolt that holds it on. You don't have to create socket wrench monstrosity like I did, but it doesn't hurt.
 

Attachments

  • rear_sway_bar_jeep_wrangler_coil_suspension_lift.JPG
    rear_sway_bar_jeep_wrangler_coil_suspension_lift.JPG
    93.7 KB · Views: 11,953
4 - Remove the bump stop

We are ready to work on the coil now, so the bump stop needs to be removed. It's a piece of rubber that sits inside of a cup. I found that a large pair of channel clamps allowed me to pull it out (It can be surprisingly hard to pull out - and don't get me started on putting it back in!)
 

Attachments

  • bump_stop_jeep_wrangler_coil_suspension_lift.JPG
    bump_stop_jeep_wrangler_coil_suspension_lift.JPG
    74.9 KB · Views: 26,443
5 - Remove bump stop cup

Now, remove the bolt that holds on the bump stop cup
 

Attachments

  • bump_stop_cup_jeep_wrangler_coil_suspension_lift.JPG
    bump_stop_cup_jeep_wrangler_coil_suspension_lift.JPG
    86.4 KB · Views: 18,446

6 - Remove the coil

It took me some time to find the right jack placement, and alas, it was after this photo was taken. The idea is to hold the frame up high, while dropping the axle down low. Jack your jeep up as high as your jack will go, and put jack stands under the frame, then lower the axle.

As you can see here, the axle is dropped far enough to allow me to pull out the spring.
 

Attachments

  • remove_coil_jeep_wrangler_coil_suspension_lift.JPG
    remove_coil_jeep_wrangler_coil_suspension_lift.JPG
    88.9 KB · Views: 7,291
  • remove_tj_coil_jeep_wrangler_coil_suspension_lift.JPG
    remove_tj_coil_jeep_wrangler_coil_suspension_lift.JPG
    79.7 KB · Views: 11,409
Last edited:
7 - Reinstall the coil

Now, you'll need to sit the new coil spacer on top of the coil and put it back in place. Once everything is seated, put the new bump stop extension up through the coil, and bolt the cup in place with the new bolt supplied with the kit. Finally, push the rubber bump stop in place - I found that squirting some armor all on it made it go in place alot easier.
 

Attachments

  • reinstall_coil_jeep_wrangler_coil_suspension_lift.JPG
    reinstall_coil_jeep_wrangler_coil_suspension_lift.JPG
    90.2 KB · Views: 1,883
8 - Jack up the axle

Once you get the coil in place, you'll need to put your jack under the axle and jack it up far enough to reconnect the rear sway bar.
 

Attachments

  • jack_up_axle_jeep_wrangler_coil_suspension_lift.JPG
    jack_up_axle_jeep_wrangler_coil_suspension_lift.JPG
    75 KB · Views: 5,120

9 - Install the rear shocks

Now you'll need to install the rear shocks. I found it easier to install the metal mount by taking the rubber bushing out of the shock and pushing the mount through the bushing. Then to get the bushing back into the shock body, I found a socket that would allot the mount to slip inside, and press on the rubber bushing. I then pressed the bushing back in with my hands.
 

Attachments

  • install_shock_jeep_wrangler_coil_suspension_lift.JPG
    install_shock_jeep_wrangler_coil_suspension_lift.JPG
    112.1 KB · Views: 1,895
  • install_shock2_jeep_wrangler_coil_suspension_lift.JPG
    install_shock2_jeep_wrangler_coil_suspension_lift.JPG
    89.3 KB · Views: 1,634
  • shock_on_body_jeep_wrangler_coil_suspension_lift.JPG
    shock_on_body_jeep_wrangler_coil_suspension_lift.JPG
    49.7 KB · Views: 1,257
10 - Install your stickers

Finally, slap your sticker on, and get moving with the other side!
 

Attachments

  • install_stickers_jeep_wrangler_coil_suspension_lift.JPG
    install_stickers_jeep_wrangler_coil_suspension_lift.JPG
    79.5 KB · Views: 3,066
11 - Remove the front tie rod

Once I finished the rear wheels, I moved onto the front. Just jack up the front axle and remove the wheel.

Now, unbolt the front tie rod
 

Attachments

  • stock_jeep_wrangler_coil_suspension_lift.JPG
    stock_jeep_wrangler_coil_suspension_lift.JPG
    85.8 KB · Views: 11,833
  • taking_off_tie_rod_jeep_wrangler_coil_suspension_lift.JPG
    taking_off_tie_rod_jeep_wrangler_coil_suspension_lift.JPG
    86.6 KB · Views: 5,030

12 - Remove shock

Now, remove the shock and position the jack stands
 

Attachments

  • top_front_shock_jeep_wrangler_coil_suspension_lift.JPG
    top_front_shock_jeep_wrangler_coil_suspension_lift.JPG
    50.9 KB · Views: 5,541
  • position_jack_stands_jeep_wrangler_coil_suspension_lift.JPG
    position_jack_stands_jeep_wrangler_coil_suspension_lift.JPG
    86.1 KB · Views: 4,786
13 - Remove coil

Jack up the frame, and lower the axle. Once the axle is dropped, the coil will come right out.
 

Attachments

  • remove_coil_jeep_wrangler_coil_suspension_lift.JPG
    remove_coil_jeep_wrangler_coil_suspension_lift.JPG
    70.2 KB · Views: 2,796
14 - Install spacer

Now that the coil is out, just remove the cup and add the new 2 inch spacer
 

Attachments

  • spacer_jeep_wrangler_coil_suspension_lift.JPG
    spacer_jeep_wrangler_coil_suspension_lift.JPG
    75.4 KB · Views: 22,577

15 - Reinstall coil

Now, you can reinstall the coil. The coil may be a bit snug, I had to coax it back in.
 

Attachments

  • install_coil_jeep_wrangler_coil_suspension_lift.JPG
    install_coil_jeep_wrangler_coil_suspension_lift.JPG
    80.2 KB · Views: 6,497
  • install_coil2_jeep_wrangler_coil_suspension_lift.JPG
    install_coil2_jeep_wrangler_coil_suspension_lift.JPG
    89.7 KB · Views: 1,681
16 - Finishing up

Once the coil is in place, you can raise the axle back up, and reattach the sway bar.
 

Attachments

  • finished_front_jeep_wrangler_coil_suspension_lift.JPG
    finished_front_jeep_wrangler_coil_suspension_lift.JPG
    68.1 KB · Views: 11,284
All done

After finishing a lift, you should always have an alignment done. I drove the jeep to a local tire shop and was surprised at how off the readings were. Here is the findings from the shop (note the red numbers)
 

Attachments

  • jeep_tj_alignment.jpg
    jeep_tj_alignment.jpg
    64.6 KB · Views: 2,431
Last edited:
Back
Top