258 cj7 rough idle; won't idle

I messed around with it some more...adjusted the choke and now it definitely runs smooth while cold, but as it warms up it starts to run rough and die.

Yeah I want to try anything and everthing before tearing into the carb! I'll continue to mess with it you have any ideas send them my way!

thanks for all your help!
 
Try just running one line in with a one line out clear plastic filter.
You will see the gas in the filter and it takes there. You will also see when to change it.
 

now if I take the air cleaner off it dies .... I have to laugh!
 
now if I take the air cleaner off it dies .... I have to laugh!


If it stalls when you remove the air filter, you still have a little bit of tweaking on the choke adjustment. The air filter is a part of a restriction, therefore aiding the choke. If this occurs before the engine reaches the normal operating temperature, this means that the butterfly is too open due to the choke adjustment.
 

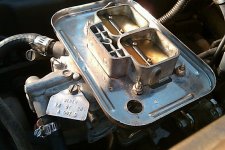
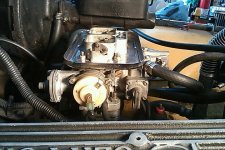
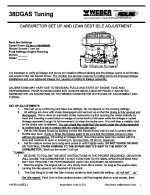
I want to say its a 32/36 DGEV, but I can only go off of pictures, It was installed when I bought it, and I have no documentation. It has the electric choke.
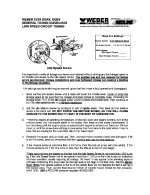
Here are three that should help.

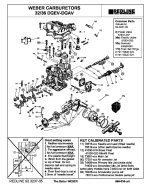
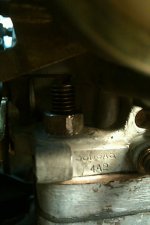
First lets positively identify your carb. If it is a genuine Italian designed Weber it will have the series and size stamped into the base flange of the body on the end opposite the choke.

Of these three if you will study the tune guide,... consider each line of it as proved Weber facts and be be much better attuned to what adjustments if any need to be made to it.


As far as the timing goes, it was idling but at a higher than normal rpm...about 1100. I realize it's not the right way, but I was just happy to hear it running again and I wanted to see if it made any difference.

Just as Terry mentioned some are required to set the initial timing by one scale while others will use the other. However one is better for discovery sake than the other that is the higher of the two.

If your engine is under computer control (C.E.C system)which means that all nine or ten switches, fixtures are working properly then you should use the 1600rpm setting however to do that you must first fully warm the engine as with either technique and then disconnect the electrical connection at the 4 &10Hg vacuum switches. They would be mounted to the firewall and one of the two will have a green cap/valve applied.

Now if you have nuttered the jeep ignition or have doubt that all the necessary C.E.C. system is functioning then set you timing at the curb idle speed once you verify the centrifugal availabe at 1600.

A note, if you set the nutered I6 engine to the factory recommended rpm then at idle speed one should expect to see 2* or very slightly under that at typical curb idle speed, so that if you bump it on up to say 8,9,10 or your preference up to say a max of 12* all is well unless knock occurs while having the heavy foot..

The purpose to using the factory technique is that when setting to 1600 at the recommended degree (most are 8* + or - two degrees). So that is the same as 6* to 10* BTDC at that speed. That is to determine how much centrifugal advance you have available in the advance head.

So say if you set initial to 8* at 1600 and then backed the speed down to curb idle where no centrifugal is in and then read the timing scale you could subtract it from the 1600 reading and know exactly what you have available.

Now if you have a functioning CEC system all things are good since the computer will allow advance as well as retardation of the total timing.

If you do not have a good CEC system for what ever reason then once you have determined what advance head is installed remember to bump the timing up to suit your driving need.

Weber by the way recommends at least 10-12 initial. If the ignition and engine are sound and in good working order then you should not expect to experience any ping/detonation unless you exceed that range.

Of course both techniques require you to disconnect and plug the vacuum advance tube.
 

Attachments

  • DG series 001.JPG
    DG series 001.JPG
    234.5 KB · Views: 528
  • DG series 003.JPG
    DG series 003.JPG
    222.2 KB · Views: 331
  • 12.JPG
    12.JPG
    223.6 KB · Views: 274
OK, the rebuild is done - overall the carb looked very good however the idle tubes were clogged, but not anymore! I put the carb back on last night. It started and idled pretty good today. i had to shut the engine off, and now it won't fire :lol:. I definitely think I made some progress, and now I am focusing on the electronic choke. Reading up on that now...hopefully its just a matter of getting it adjusted along with the getting the timing back where it should be. I haven't given up yet!
 

Have you positively identified the carb as being a Weber? Reading of clearing the idle tubes leads me to think you maybe running with the Carter/Weber BBD. It will have the electric stepper motor at the rear of the body, adjusting air mix.

If it is a Weber it will appear near to the diagram and it's identification will be stamped at the base on the end that is opposite of the choke assembly end.
 
I have a metal plate with Weber stamped on it along with some numbers....nothing that resembles model numbers. This plate is attached to the screw next to the fuel inlet tube. At the base opposite of the choke there is a stamp "Italian" but no model number. With that, I assumed it was a Weber.

geeze I'm learning a lot more than I had intended to!

I just put in a fuel pressure regulator, I can see fuel going into the carb and I can smell fresh gas....
 

Based on the appearance you have the gem of the Redline Weber jeep conversion carbs, a 38DGES Thanks for the pictures.

If you will look closely the ID stampings will appear where I mentioned, considering that the two sides are longer than the two ends of the body and the base is that area which has the carb mounting holes through it.

Here is the tune guide line for that series. Let us know how well the carb allows the engine to react while establishing those to be expected maximum screw settings. The screws do tell all as the point of reference to tuning the carb to fit your application.

While you were inside did you find it necessary to adjust the floats in order to establish the setting that Redline Weber recommends that us jeeperz use and your mention of a clogged channel, orifice or jet I wonder what and where found that issue?
 

Attachments

  • 07.JPG
    07.JPG
    246.7 KB · Views: 523
The first tubes that were clogged were the tubes leading to the top of the butterfly valves. I access these when the carb was apart. I first tried shooting cleaner up through them and nothing came out, then all of a sudden fluid shot through them. I thought these were the idle tubes. Then after the carb was back on the Jeep I was looking as some documentation of the outside of the carb and it should the location of the idle jets...big screws on each end towards the top of the carb. I removed these and had to use a thin wire to clear these out but eventuall the cleaner flow through these as well. I ordered the rebuild kit for the 32/36, I hope I didn't screw anything up now that its on jeep. I did replace the needle and seat which is what I concerned with.

I did get it to start....when cold it runs real rich and rough, but then quickly smooths out. Once it warms upit starts to run more rough again, but not near as bad as it was! I get the feeling it works a lot better now, I'm just worried now that I put the wrong parts in!
 

I ordered the rebuild kit for the 32/36, I hope I didn't screw anything up now that its on jeep. I did replace the needle and seat which is what I concerned with.

I did get it to start....when cold it runs real rich and rough, but then quickly smooths out. Once it warms upit starts to run more rough again, but not near as bad as it was! I get the feeling it works a lot better now, I'm just worried now that I put the wrong parts in!

It's all good with the kit, both the DGS and the DGV kit parts are the same. The concern may be that you used the float setting guide illustrated on the DGV detail sheet. Did you and are the floats brass or plastic?

With your mention of running rich,..please describe the symptoms, black smoke/sooty plugs etc. or simply a stinker. This is often confusing to discern the actual condition.

I believe that when you adjust the screws to the correct guideline base lines then at least some of this potential issue will be behind you.
 
I didn't adjust the floats only because I really didn't know how to, and i didn't have a reliable means of verifying the distances that Weber recommended. The floats themselves were brass.

When it first starts up, the engine "chugs" and there is some blueish/gray smoke that has the rich/gasoline odor. It has only lasted about a minute and then it smoothes out back to normal. I just assumed it was rich starting off.

I hope its not the floats!
 

Is that just an aluminum casting or is that a crack on the base?
 
Back
Top